Ranch Rehab
Project Overview
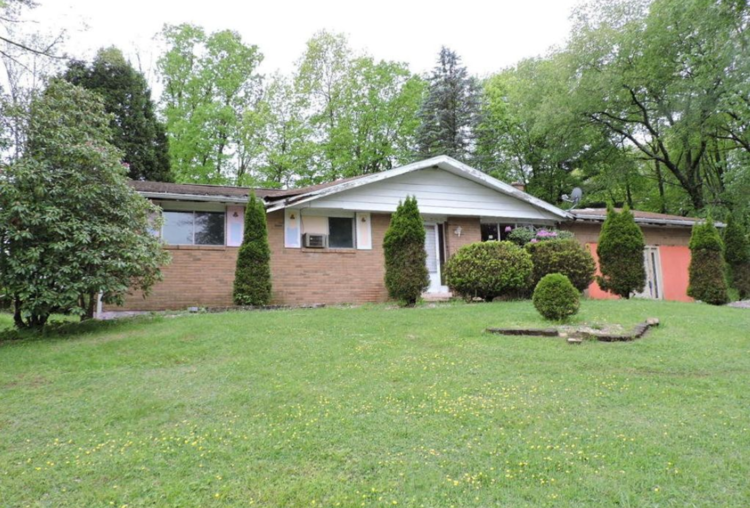
MHS revived this 1964 three-bedroom ranch. Mike operated as the owner-builder on this renovation. In this role, Mike learned first-hand the stresses that homeowners are under when they are undergoing a renovation.
The property sat abandoned for some time and required significant repairs. The original kitchen, bathrooms and fixtures were all replaced for updated versions. The new floor layout is very similar to the original. With slight changes were made to accommodate for new full bathroom, new laundry room and new office nook.

Located a few hours outside New York City, this property lives in a rural Pennsylvania.
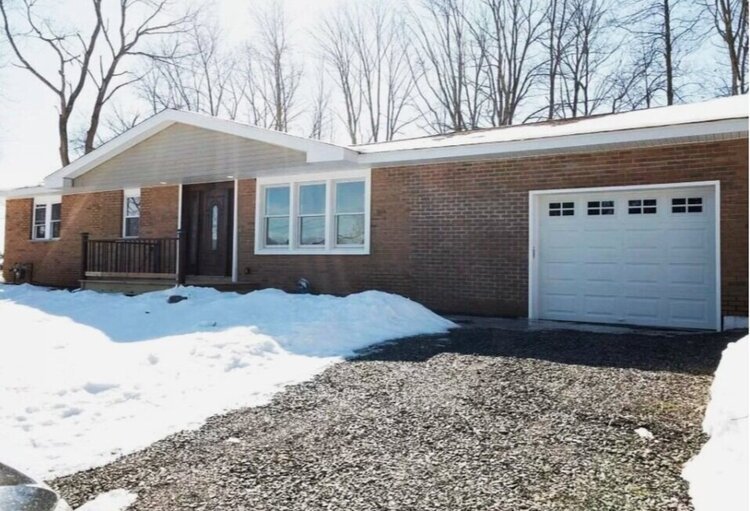
BEFORE
Construction
The objective of the renovation was to introduce modern design and improve functionality on a strict budget. Given that the electrical and plumbing systems were over 60 years old, a gut renovation was deemed the most practical solution. The property, a single-story ranch with the three bedrooms and 1.5 baths, was originally built in 1964 and required a complete overhaul.
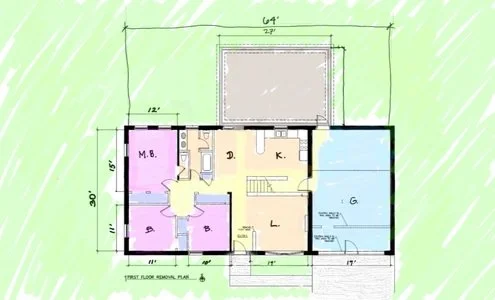
Green - Yard / Landscape Areas
Gray - Walkways & Driveway / Hardscapes
Light Blue - 2-Car Garage
Yellow - Stairs / Hallway / Circulation
Orange - Service Areas
Violet - Bedrooms / Private Areas
Dark Blue - Closets / Storage
As a New Yorker with rural roots, Mike found solace in the open spaces, lush greenery and serene surroundings of his current location. In contrast to the often chaotic construction projects typical of NYC, the construction process in rural Pennsylvania was more streamlined. The nearest neighbors were at least several hundred feet away, and any noise was barely noticeable. The MHS team completed their work without neighbors trying to shut down construction.

Plumbing
The plumbing was on a septic system, not uncommon in rural settings. In order to reconnect the home’s plumbing into municipal services, Mike had to clear up the debt accrued by the previous owner.
Lush Landscape
Typical of this area, trees line the property, especially towards the rear and side. Trees are great for shade in the backyard and are important features of the landscape, but also require maintenance. An issue that came up, was a damaged tree near the property line, was in dangerously close to power lines. The tree was practically on the property line, and its repair was negotiated with the neighbor.
In the front yard, the landscaping was also upgraded as part of the renovation.

Site: In this image, we can begin to see the rural/suburban context. The residence is situated along a main road.

Site Context: In this satellite image, we can see the residence is located down the road from the Misericordia University campus.
Reconfigure Plans
A complete rebuild allows for more flexibility to build anew. The aging condition of the existing building made it an easy decision to start fresh. All finish materials, including cabinets, decorative stone, dropped ceilings and partition walls were removed, while the building structure was reinforced and restored from within.

With the building reduced to its shell, the building’s service infrastructure could be analyzed. Plans for new layout included laying new electric, gas/heating and plumbing.
There was plenty of room on the property to place a dumpster to dispose of all debris.

Man Power
Labor was a critical issue in this project. Mike brought the crew to PA from Brooklyn, arranged transportation and housing for everyone.

Planning and Design
Final dimensions for the updated floor layout could be established. An initial plan for the design was based on the existing location of walls and utility connections.

Re-Design Goals: Improve Layout to Maximize Function
The goal of this project was to get the house in working order and install quality materials. The original program of the floor plan was kept more or less the same. Adjustments to the wall dimensions were changed to ensure better flow and use of square footage.
The most visible change to the floor plan was the relocation of the basement stairs. The stairs were moved from the original location between the Living Room and the Kitchen. The stairs were rotated and moved behind the kitchen and garage to create a more open layout and improve sight lines between the Kitchen and Living Room.


Kitchen
The original kitchen installed in 1964 was still intact but in need of upgrading. We gutted the wood cabinets, counter, appliances and plumbing fixtures. In addition, the half wall and the interior stone veneer were also removed. The dropped ceiling met the wall at the top of the window height. Removing the ceiling tiles made room for taller wall cabinets and full height ceilings.


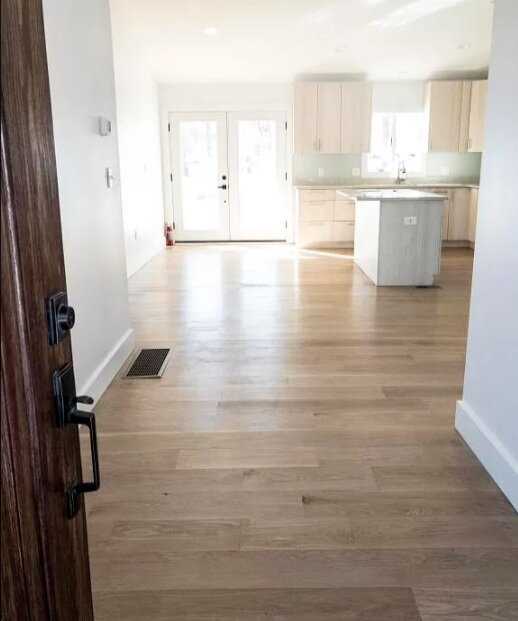
Dining Area
In the dining area, the sliding doors were repositioned and updated to French doors that open to the rear deck. Originally, Mike hoped to expand the decking area, but was directed to keep the original footprint by the local building department. The existing sliding doors lead out to the backyard.


Basement Stairs
The walls around the staircase down to the basement were dividing the kitchen and living spaces. The stairs down were relocated behind the kitchen. A new skylight was added to the stair area to provide natural lighting.
Office Nook
The length of the kitchen space was shortened. Adjustments made in the floor layout, taking away space from the garage, made it possible to include a home office space. This is more important post-COVID with more options for remote work. Not to mention, as housing becomes less affordable in the megacities, people are seeking more remote locations for affordable housing.

View to Dining area from Living Room
Entry / Living Room
The curved window was replaced with one that went straight across the opening. The half wall feature was removed. The black stone flooring was removed, and new wood flooring was installed throughout. The stone finish and fire place was removed during the removed. The existing fireplace was not in working condition. The new back wall perpendicular to the perimeter wall was moved back about five feet to make the Living Room space larger. The base radiators were removed, and new base molding was installed. The stair railing was also removed.


Ceilings
The existing dropped ceiling was removed as part of the gut. In the new Living Room, the ceiling height profile is changed to take advantage of the height under the pitched room. New recessed lights were also installed throughout.

Looking towards Garage door.

Looking towards Bedrooms
Hallway
The hallway space separates the more public areas of the house from the more private areas. It severs as a buffer or transition space into the more private zones of the bedrooms. The hallway was more or less rebuilt to continue in that function, with some slight adjustments. As is common in this style of architecture, the hallway blocks the direct line of sight into the bedrooms and the service room like the bathroom and laundry room.

Full Bathroom in Hallway with Tub for children.
Bathrooms
Previously, there was only one full bathroom and a wash closet off the Master Bedroom. In the improved layout of the bathroom area, we were able to fit a shower and hand sink to complete the Master Bath. Having two full bathrooms greatly improves the function and adds to the overall value of the home.
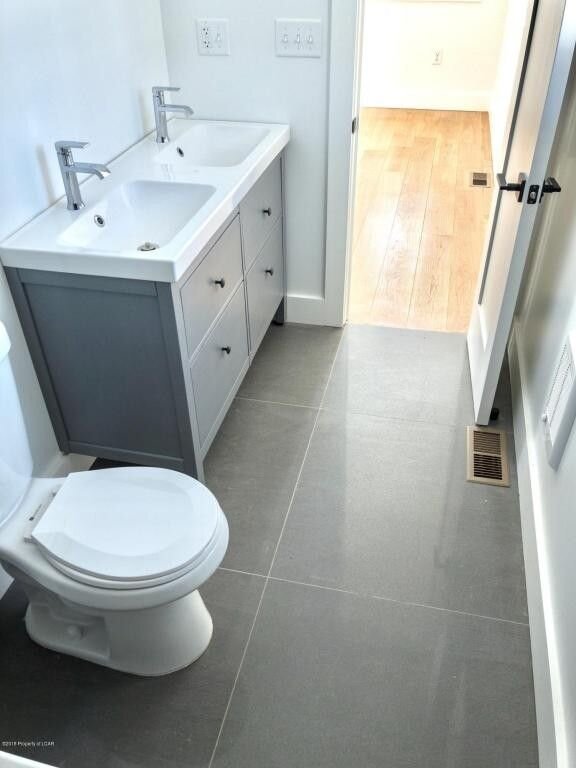
Master Bath with shower and double sink.

Laundry Room
As we move towards the Hallway, there is a new laundry room at the previous location of the small linen closet. Additionally, the previous hallway closet was eliminated and the space was incorporated into the adjacent bedroom.


Bedroom
Bedroom-2 and Bedroom-3 grew slightly by rearranging the previous closet layout. New doors were added to the bedrooms to add to the finished look.


Garage
Going back to the opposite side of the house, the Garage area was also renovated. The existing condition of the Garage Area was not being used to park cars, as there was a makeshift stage and other walls subdividing the space. MHS worked to restore the original program to this space. A new 10-foot wide door was installed. Two cars could fit in tandem. The door out to the backyard from the garage was closed-off, leaving only the entrance into the Living Room space.
This image was taken before the installation of the new asphalt driveway.
Driveway
The driveway and entryway were also improved. The previously long gravel driveway was paved in asphalt and the concrete walkway was also poured new.
Finally, all the existing windows were also replaced with modern double-pane windows to mediate the changes in climate.

Lower level, side entry.

Rear facade and damaged deck.
Rear Yard
Only a makeshift foundation of cinder blocks marked the perimeter of a rear deck that once was. The deck area was rebuilt in the same footprint. Mike had petitioned the city to let him expand the coverage of the deck, but for one reason or another the municipality refused our request.
Thank you for your interest in learning more about MHS’s projects.
Photos by Mike Cuaulte