Galley Kitchen
MHS orchestrated the full-gut renovation of this small kitchen, tightly packed with functional details. As the GC, we collaborated with the homeowners, their interior designer and other trades professionals to successfully execute this kitchen renovation on the Upper East Side.

Project Intro
With no room to expand the kitchen layout, luxury materials and design component are utilized to elevate the spacial quality. The homeowner came to us with plans and interior specifications prepared by the interior designer. The interior designer to figures out how to incorporate the client’s needs and wants into the new design. As the general contractor, we figure out how to bring ideas into physical reality. The GC plans out every detail required to successfully execute the kitchen design.
In the simplest terms, we figure out how to remove the old kitchen to install the new one. Most of our work happens behind-the-scenes, through coordination between the homeowner and the interiors designer on one end, and trades professionals, building management and vendors on the other. The GC has to bring tools and rough materials required in proper order of operation to respect project timelines and budgets.
Galley Kitchen
To maximize efficiency and function, the general layout of a galley style kitchen remains the same. Galley kitchen design are the most efficient design for kitchens with small footprint.
The functional triangle, of the Sink, Cook top and Fridge works well, so “don’t fix is not broke.” The function


Site Visits

Mike meets clients on-site to assess the complexity of the construction process based on what it will take to convert the existing conditions into the new design. With the initial design in hand, Mike calculates the cost of labor and material to transform the space.


The Design
The custom millwork is the main feature of the new kitchen design. The use of white in the backsplash tile, upper cabinets, stone countertops and even the outlets covers lighten up the visual heaviness. Color visually unifies or groups those components. The boundary between the upper cabinets and backsplash can seem to blend together, but also stand in sharp visual contrast to the dark blue of the base cabinet fronts.
The interior designer worked with the homeowner to figure out the design specifications, and noted them in technical drawings for the builder, fabricators and trades.

This plan view lays out the floor layout. The available wall space in between doors and windows determine the placement of the major appliances and plumbing features.


Heights and widths of cabinetry and appliances are noted in red on the elevation drawings. Architects and interior designers technical drawings, or “blueprints,” to communicate designs to construction tradesmen.
The color overlay separates each kitchen systems working together. The purple marks the upper and base cabinets, yellow are appliances, green plumbing features, and pink the backsplash wall tile.
Project Management
There are many moving parts in any kitchen renovation. Mike plans out each step from beginning to end. He keeps track of the progress throughout, and maintains open and clear communication with clients. Previous clients have expressed appreciation for Mike’s communication throughout the process, and not to mention his problem solves skills.
Scheduling
Tight deadlines don’t leave room for error. A mishap in scheduling could easily push back a project’s timeline. Effective communication is key to minimize mistakes that could result in delays. Managing deliveries, tradesmen’s and other changes in real time are all part of the project management.
Communication the most important part of project management, and will make or break a project.
- Mike
Scheduling of plumbers, electricians, carpenters, laborers and material deliveries must be taken into consideration. Additional timeline constraints like long lead times on custom products should be taken into consideration for time management.
The general contractor coordinates deliveries of appliances, equipment and materials into the renovation space. It is important to have a detailed construction contract with timelines, scope of work and costs.


Demo
Demolition starts with protection of areas that are not part of the construction. Sealing-off the work area with plastic sheets, minimizes the spread of dust. The crew installs protective material over any areas “to remain.”
The guys remove finishes materials and casework while maintaining structural integrity of the space. With no drywall, or plaster and lathe which is common in older structures, expose the residence’s bones. Brick, wall studs and utility lines in the walls can all be examined for damage at this time.


Flooring
Several layers of existing flooring were removed to give the floor plain a fresh and level surface to install new subfloor. This allows for the proper installation of new ceramic tiles. The light color helps reflect more light into the corridor-like space.


Plan for Surprises
Hidden problems behind wall or flooring reveal themselves during and after the demo.
Water damage on the floor, for example, could be pinpointed after removal of drywall and tiles. Kitchens and bathrooms usually suffer from water damage from the occasional overflow. The areas around water supply pipes, drains and radiators often have damage. Homeowners and contractors should both set aside a percentage of the budget for unforeseen issues.
Replacing utility lines are an important part of a kitchen renovation. Normal wear-and-tear could easily become a health hazard. Old water pipes could be contaminating drinking water. Outdated electrical lines could even cause home fires. Today’s appliances demand more power than these power lines were meant to move.
MHS works with licensed plumbers and electricians. The plumber services the gas and water lines. They would be the one to be responsible for the disconnection, movement of connection point and finally re-connection of gas and water pipes. Water shut-off need to be scheduled when replacing old pipes in the same location and for moving line locations. The homeowner organizes this with building management to shut off the water supply in a multifamily building. This is definitely more complex than the typical single family home.


Radiator Enclosure
The radiator is hidden behind a metal enclosure. Sheet metal fabricators make custom residential radiator enclosures. The paint finish is baked on the metal, and will usually differ slightly to the base cabinet paint finish, despite the goal of blending in with the base cabinets.


Millwork
After new drywall is hung and the floor tile is laid, the millworker comes in to take final field measurements.
These cabinets were designed to serve the unique needs and desires of the end user. Millwork is handcrafted with quality material and is the main feature of the project. The layout and luxury quality door fronts and hardware work together to elevate the experience and feel in the completed space.
Custom Millwork
This corner maximizes the little wall space between the doors. The deeper custom cabinets fit the refrigerator and allows for a tall pantry space. The end panel against the fridge gives it a more integrated look, instead of the appliances standing out as separate visual components. The dimensions of the refrigerator defined the height and width of the upper and side cabinets.
Fabrication & Installation
The mill worker fabricates the cabinets and installs the cabinets. The laser level is used to ensure countertops will be installed level and that upper cabinets are installed at designated heights.
Wall Backing
Extra structural bracing is installed on which wall cabinets are attached. Heavy wall hung items need to be fastened to more than just drywall to sustain the heavy loads of cabinets frames, doors and everything that will be stored.
.


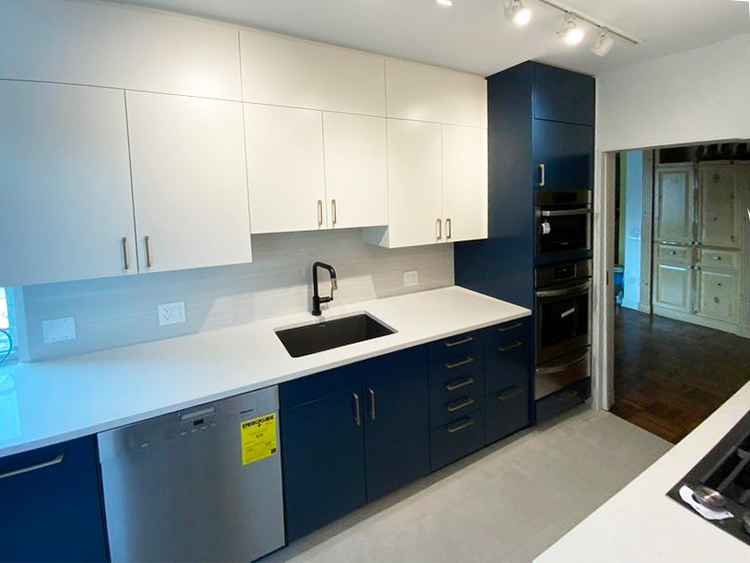
Contrasting Colors
The use of white of the upper cabinets lighten its visual weight. The darker blue in the base cabinets anchors them to the floor.
Other items upgraded
New white stone countertops and new tile backsplash with at counter outlets. New under mounted sink & gooseneck faucet with single handle and black matte finish. Updated pull handles were installed. The crown molding was replaced with a reveal. Upper cabinets were shortened and separated in two.


New Stainless Steel Appliances
The range, and hood were replaced. Full height cabinets enclose double ovens installed in contrasting colors. Additionally, the under counter dishwasher was installed to the left of the sink in the same location.

The End
The team finished up the project just in time to for Thanksgiving dinner. Hope you enjoyed some insight on the MHS construction process.